Sunday, February 2, 2020

Cookie Cutter Ice Windows

Cookie Cutter Ice Windows

With a deep cookie tray and cookie cutters, you can make an ice window that looks great in daylight or with illumination at night.

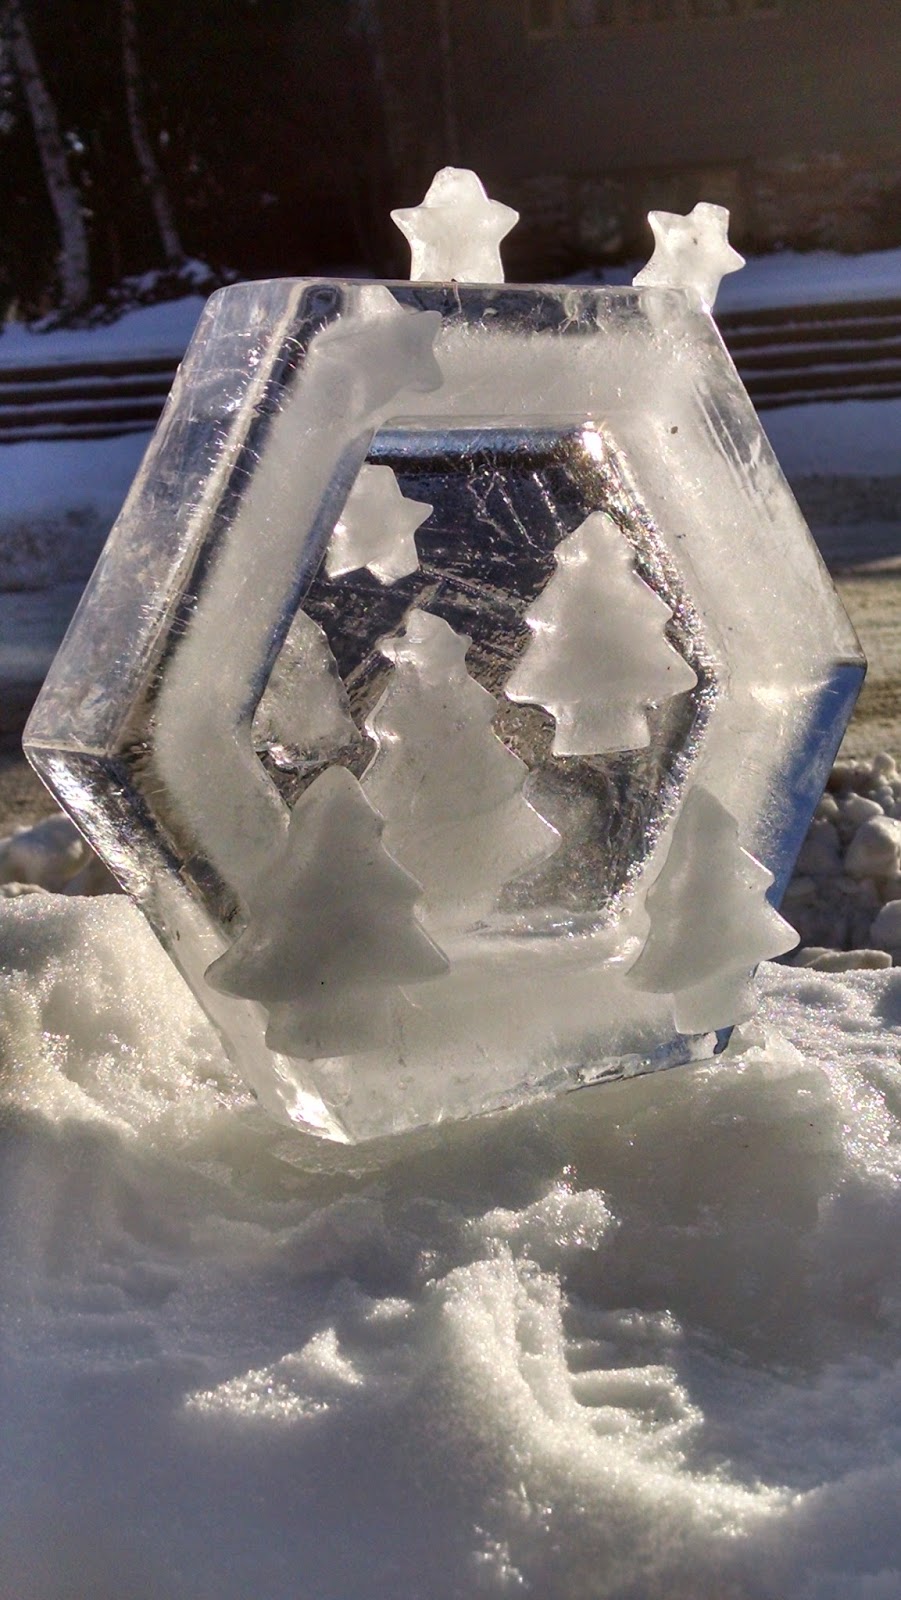
Jen Hedberg's excellent book, Ice Luminary Magic, provided the inspiration for this method, but in reverse.  She shows how to use cookie cutters to make ice shapes.  By switching which ice is saved and which is discarded, I make cookie-cutter shaped holes in ice windows.  

The "trick" is to keep as much water as possible out of the interior of the cookie cutters while freezing the ice in the tray.  This is accomplished by starting with the tray, the cookie cutters, and the water as cold as possible.  Then you pour a very thin layer of water carefully around the cookie cutters.  Leave it to freeze.  Keep more water at near-freezing temperatures and pour additional layers, letting each one freeze around the cookie cutters.  
When the ice is thick enough (usually five to eight layers), set the cookie tray on bubble wrap in the bathtub and release the sheet of ice.  Sometimes it works to just twist the tray a bit, but it may be necessary to pour a little hot water over the bottom.  I set the tray aside to use later for carrying the ice sheet.  If you're lucky, there is little or no ice inside the shapes, but usually you have to melt out a thin layer.  For that, I use a focused spray of hot water aimed into the cookie cutter while the sheet is held upright.  The hot water also helps loosen the cookie cutter so that it can be slid out.  

I'll generally slide the sheet of ice gently back into the tray after removing the cookie cutters.  At that point, it's possible to put it back outdoors with a bit of fresh ice-cold water to re-freeze.  That produces a solid ice window that usually has the design in clear ice while the rest of the sheet is milky white.  
Sometimes the result of adding back water is to make a ghostly image.  The main point of producing a solid sheet of ice is to be able to assemble four sheets into a square to make a large luminary with a candle in the middle, while protecting the candle from the wind.  For display as just a sheet standing up on end, I usually leave the holes open.

To add depth to the ice window, I often add ice appliques made in silicone baking pans like this one.  They can be "welded" in place by wetting them in ice water and touching them to the surface of the ice sheet.  


"Cut glass" ice lantern

This ice luminary is a variation on one from Jen Hedberg's book Ice Luminary Magic, in which a flexible insert into a bucket is used to produce a patterned surface on an ice lantern.  

For this one, we use a silicone roasting mat called "Pyramid Pan" and a commercial hexagonal Arctic Ice Lantern mold.

To make this version, I trim the curved ends of two Pyramid Pan mats.

For a small luminary, one mat is enough, but for the Arctic Ice Lantern mold, it takes two of them, overlapped inside the mold.

Here, the two mats are nested inside the Arctic Ice Lantern mold, with an overlap of several rows.  

It helps to freeze them in place with an initial inch or so of water in the bottom of the mold.  This should not come up over the indentation at the bottom, since that will provide the opening when the luminary is unmolded.  Very cold water is added after the first inch freezes, and that is allowed to freeze about 2" thick.

Here, the frozen luminary has been removed from the mold (seen in the background), by setting it upside down in a bathtub until it loosens, and gently letting it unmold onto bubble wrap.  It's been turned over to expose the opening that was created by the indentation in the mold not freezing solid.  There is a layer of ice on the outside of the Pyramid Pan mats, and that needs to be removed by freeing up the overlapped edge (using some hot water) and pulling it off.

I poured some hot water along the edge of the overlap until I could begin peeling it away from the luminary.  Once it starts pulling free, the remainder falls away easily in large sheets.  

There are a few points where this can be tricky.  It's sometimes hard to be sure the walls are thick enough, and I've had to add back the cold water and continue freezing if they are too thin.


I make a smaller version of this luminary in an extra-large Clorox wipe container from which I cut off the ridge at the top.  

For this one, I trim a Pyramid Pan to fit the mold.  This avoids having to overlap two mats, and it can be made in a home freezer.

This small lantern doesn't tolerate having a flame inside, but it can be illuminated with LED lights.


Here is one of the small "cut glass" luminaries inverted over an LED light and illuminated on a snowy night, when it would have been hard to have candles burning.

Saturday, December 22, 2018

Miniature ice figures

Sometimes it's not cold enough outdoors to make ice lanterns.  One thing to try in the home freezer is little ice figures -- ice "snowmen," or "icemen."

A tiny ice "snowman" on an
LED-illuminated ice base
There are several devices for freezing ice spheres.  These little figures use two sizes of molds.

A TOVOLO mold for making a single ice sphere
The top and bottom of the spheres can be flattened by rubbing them with a metal bowl filled with hot water.

The flat area was produced by rubbing a
flat-bottomed metal bowl across the end
of the ice sphere.  
The spheres can be stacked, then left in the freezer to solidify.


The flattened ends "weld"
together, allowing stacking
With a small-diameter electric drill, make holes for the desired features.

Drilling a hole for an arm
Twigs or stems from garden plants such as garlic chives and aster seedheads can be dipped in cold water and stuck into the holes to provide arms, eyes, buttons, etc.

The eyes are individual garlic chive
seed pods, and the arms are their
stems.  The hair is from a hydrangea,
and the buttons and nose are from asters

Raised up on a chunk of ice left from before a thaw, the tiny ice figure reassures passers-by that colder weather will return, and with it, more ice lanterns.


For larger icemen, click here

To return to the main page, click here

Saturday, February 18, 2017

Middlemoon Creekwalk


One of our favorite ice lantern events is Jen and Tom Hedberg's Middlemoon Creekwalk.

Click here for a link to their 2016 blog posting about that marvelous late-winter event.  

The Creekwalk was begun several years ago by the Hedberg family, who inspired our interest in ice luminaries in the first place.  We brought ice lanterns to that display in 2015 and 2016 when they invited the community to join them in lighting up a small creek near Lake Harriet in Minneapolis, but the main "show" is the hundreds of luminaries that Jen and Tom place along and even in the creek.  It's magical!

While the rest of the city celebrates the early spring, some of us are hoping for one last blast of winter cold and snow, so that we can enjoy the Creekwalk enchantment again this year.  If 2017 brings another opportunity to make and light ice lanterns, that link will provide up-to-date information.

The Star Tribune published an article on Jen and Tom's ice lanterns and the Middlemoon Creekwalk -- click here to see their blog entry about it.  (We were mentioned as community members who contributed ice lanterns to the 2016 Creekwalk.)

From the StarTribune February 18/19, 2017
issue (regular Saturday and early Sunday),
this article by Kim Ode celebrates Jen and
Tom's successes in the difficult 2017 ice
installation season, closing with the faint
hope of one more cold snap to let the
Middlemoon Creekwalk happen.


Friday, February 17, 2017

The Goldfish Bowl and the Ice Fishing Scene


A globe ice lantern with fish is provides 
a bit of whimsy to a winter display

 When I found an ice tray for making fish, the obvious idea was to add them to globe ice lanterns to make a fishbowl.  I fill the molds to the point of almost overflowing, make a globe ice lantern with a fairly thin wall, then "weld" the fish to the inner wall of the globe.  If they are added just after breaking the balloon, when the inside of the globe is still moist, they will simply stick in place.  Otherwise, dipping them into very cold water will make them adhere.


The ice fish glow golden in the candlelight

A Minnesota variation is the ice fishing scene.


This ice lantern was made in an IKEA Fniss wastebasket.  The bottom is open, and the fish were added by "welding" them in place on the inside with a little bit of water to moisten them.  There is a fish-hole drilled in the top, using an ordinary electric drill.  Gingerbread-man shaped ice figures were held in place with a little bit of moistened snow under their feet, and a toothpick fishing pole with a length of wire forms the fishing rod.


Because using a candle would melt and enlarge the fish-hole, this lantern is lit by placing a LED under it.

The ice-fishing scene serves primarily as a daytime decoration along the sidewalk, where its Minnesota theme is popular with passers-by.

This smaller ice-fishing scene was made with
a hexagonal ice lantern turned upside-down,
also with gingerbread-man figures fishing
through a drilled hole in the surface.

The ice-fishing scene could be lit with a candle, but that would tend to melt and enlarge the fish-hole, so I used LED lights instead.


For information on making ice globes using Wintercraft's balloons, click here.

For a general discussion of using balloons to make ice globes, click here.

To see how to find and use the ice appliques, like the gingerbread figures, click here.

Click here to return to the introductory page, with links to many other ice lantern ideas.

******************************************************************************

Middlemoon Creekwalk photos and information

Winter may be melting away too quickly in 2017, but there are many beautiful photos from the 2016 Middlemoon Creekwalk on Wintercraft's Blog HERE.


Monday, January 16, 2017

Making Ice Windows with Arctic Ice Lantern molds

Ice Windows offer a solution to some of the limitations of the Arctic Ice Lantern mold.  (It has an unfortunate tendency to crack if it isn't watched closely while freezing, and it often develops a bulgy surface when water escapes from the core during the freezing process and piles up on what should be a smooth base for the finished lantern.  These flaws can be managed when making regular ice lanterns, but they are no problem at all for making these simple ice windows.)


When extreme cold requires frequent monitoring to avoid cracking the mold, you can freeze a small volume of water in the bottom without needing to watch for over-expansion.  If the weather isn't cold enough to freeze a full lantern in a reasonable amount of time, you can still make an ice window fairly quickly.  And if nobody is around at night to see ice lanterns, a display of ice windows can brighten your day by catching natural sunlight.


Other containers with indentations in the base could also be used.  Hot water produces a clearer window.  Add enough water to cover the indented area and allow it to freeze solid.

Many different ice trays are available for making decorations for ice windows.


The basic mold for a hexagonal ice window is the Arctic Ice Lantern mold.  It can be set on another of the same shape, or directly on a mound of snow, or on some flat piece of ice.


The Arctic Ice Lantern mold's indentation 
produces a hexagonal framed window if
it is covered with just a little water.

Adding ice decorations can be very simple:

This ice window has just an ice
gingerbread man, a star in the
window, and another star on top.


A single ice whale inside the frame provides the only decoration for this ice window, which is "open" because not enough water was poured into the mold to cover the indentation.


More complicated designs are possible, with ornaments added to a base or to points around the frame.


The base for this ice window was frozen in a
water bowl for the wild birds that was left
out overnight.  The window frame was
made in an Arctic Ice Lantern mold,
and the trees and snowflakes are
from silicone ice "cube" trays
and muffin /cupcake molds


Return to the introduction page

Saturday, February 27, 2016

Base it on ice

Ice bases enhance your luminaries, raise them to viewing level, and keep them above the new snow.  The extra thickness of a base can extend the life of an ice lantern with a thin floor.  If the candle does melt through the floor, lighting a candle in the base can keep the luminary going for additional days.  A broad base can support an ice lantern on a snowbank, providing a flat surface to which it can be firmly attached.

Without a leg to stand on, these
two ice globes are swallowed
up by 9 inches of new snow

Two Arctic Ice Lanterns are placed with their
open ends together just after unmolding.
They weld together solidly.

The base brings this ice globe to
a good viewing level and adds
thickness to its floor.

This display of ice lanterns for the Enchanted
Forest by Lake of the Isles in Minneapolis
uses a couple different types of base.

An Ikea Fniss wastebasket
was the mold for this base.

A ring of ice shot glasses raises
this ice globe above the base.

Smaller bases can be useful, too.

Plastic party bowls from Party City
make small, simple bases for ice lanterns.

Here, an ice flame that was frozen in
a fluted party bowl is joined to a
base made in the same kind of bowl.
This base holds a luminary firmly in place
and keeps it steady on a snowbank.  The
mold for the base was a lid for a plastic
party tray from Party City.
Here, a globe ice lantern (made in
a punch balloon) provides a base
for another globe.

The base, sitting atop an earlier ice
lantern tower, helps raise the
luminary for viewing.

As the luminary melts through its
floor, the candle moves into the base.
The base effectively provides
extra days of life for this ice lantern.
Here are three examples of a constrained-balloon ice lantern being placed on a base made in the same kind of mold, but without the balloon.  (For constrained-balloon ice lanterns click here.)

An Arctic Ice Lantern with its
angular sides as the base for
a constrained-balloon ice
lantern also made in an
Arctic Ice Lantern mold.

Base and constrained balloon luminary
made in a plastic container from the
AxMan surplus store.

This Ikea Fniss wastebasket
constrained-balloon ice
lantern was thin to begin with
and had melted through its
floor and the end of the base.
It could still be lit from the
lower level, though.

All your base are belong to us.

Return to introductory page.