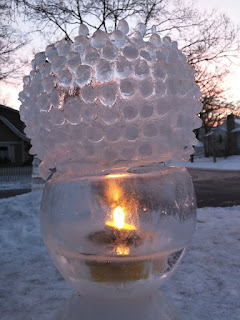
A difficult but rewarding way to make a fancy ice lantern
After seeing a metal pot with an unusual raised pattern at the Minneapolis Institute of Arts in late 2015, I was inspired to try to duplicate it in an ice lantern.
 |
| My first attempt, from an ice lantern made in the home freezer and decorated indoors in time to put outside when the first cold spell arrived. |
The first small ice lantern that I made this way attracted an unusual amount of attention from passers-by. That, and the connection with arts and crafts related to weather, made me want to keep making these, despite the large amount of work involved, and the cold fingers.
 |
| A second Arare / hobnail-hailstone ice lantern |
 |
| Cold weather kept this Arare ice lantern in good condition for almost two weeks. |
 |
| As I started making larger Arare ice lanterns, we ordered a pack of three more trays from Amazon |
I start applying the "bumps" around the top, and add them one row at a time, first dipping them into ice water, then sliding them upward a little over the surface of the ice lantern before pressing them into place.
 |
| The first row is the most difficult to keep in place, which seems odd, because it's on a level surface. |
Once the first two rows were in place, I attended to some other tasks to give those a chance to harden. It's a difficult balance, keeping the working surface cold enough to "weld" the ice decorations solidly in place, while not risking heat shock from having liquid water touch a surface that is too far below the freezing point (which can crack the ice).
 |
| At the right side of the picture is a bucket of cold water that came from the inside of the ice globe when I unmolded it. Everything has to be very cold for this method to work. |
Two trays of the ice gumdrops covered under half of this ice globe, which is larger than the two earlier ones, so the decoration required filling our two trays three times (hence the order for more trays).
 |
| The ice globe with five rows of "hailstones" in place, waiting for another two trays of them to freeze. |
 |
| A late-night addition of almost five more rows, as the temperature dropped to near zero Fahrenheit. |
 |
| The water that I was using to moisten the ice pieces began to freeze in the container as I added the last few rows. |
 |
| Finished and ready for evening, the "Arare" ice luminary glows in the morning sunlight. |
 |
| The Arare ice lantern reveals the glow that makes it a special favorite. |
Despite using an upside-down ice lantern for a base, so that there was an extra layer of ice to support the candle, I couldn't keep the floor of the Arare lantern from melting through. Water collected in the "fishbowl" below, and I ended up using a floating candle there to illuminate the lantern as it gradually melted away. Although the base was an upside-down ice lantern, with an opening on the bottom, it had sealed so tightly to the column of earlier ice lanterns that it held a pool of icy water.
Further ice lanterns of this type included the fourth one, which I made for the Luminary Loppet "Enchanted Forest" by Lake of the Isles:
... and another ice lantern for our home:
 |
| A floating candle in the ice lantern that served as a base provided the light for the luminary's last few days. |
 |
| Losing its upper rings of ice decorations and having its floor melt away couldn't dim the beauty of this special ice luminary. |
Further ice lanterns of this type included the fourth one, which I made for the Luminary Loppet "Enchanted Forest" by Lake of the Isles:
 |
| An Arare ice lantern at the Minneapolis Luminary Loppet event February 6, 2016 |
... and another ice lantern for our home:
 |
| My fifth Arare ice lantern, mounted on a globe made in a punch balloon. |
...followed by the largest so far, made on a Wintercraft ice globe and covered with more than 400 of the gumdrop-shaped ice "cubes" for the Middlemoon Creekwalk south of Lake Harriet in Minneapolis from February 14 through 17, 2016.
At the Middlemoon Creekwalk 2016, we ran out of time for setting up displays on Valentine's Day -- the first night that the lanterns were lit. Additional ice from Wintercraft's extensive collection of ice glass provided a stunning backdrop on the second night and for the later lightings.
Return to the introductory page.
 |
| This luminary took three days to make, because cold temperatures limited the amount of time I could work on it outdoors. |
At the Middlemoon Creekwalk 2016, we ran out of time for setting up displays on Valentine's Day -- the first night that the lanterns were lit. Additional ice from Wintercraft's extensive collection of ice glass provided a stunning backdrop on the second night and for the later lightings.
 |
| The sixth and largest of the Arare ice lanterns, on display at the Middlemoon Creekwalk |
Return to the introductory page.


No comments:
Post a Comment